
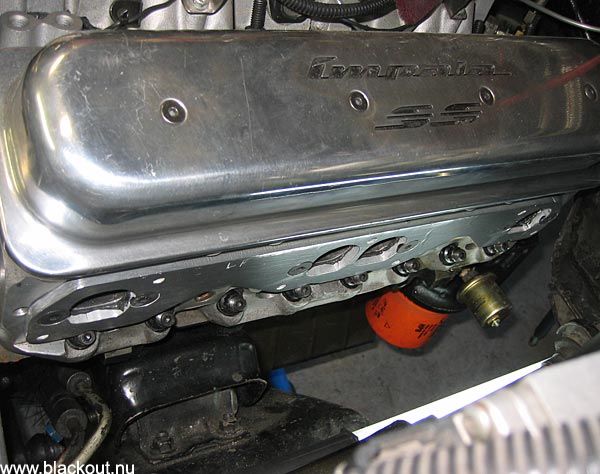
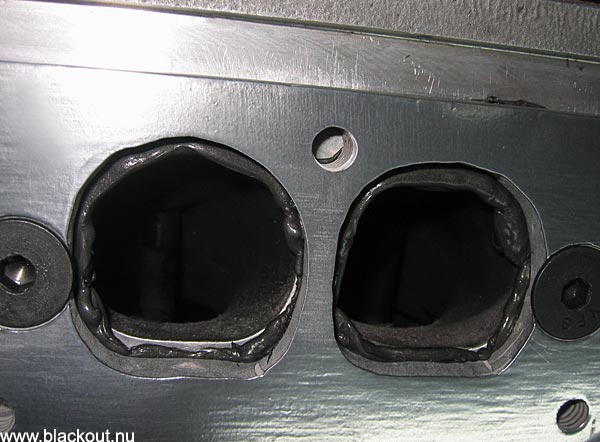
Not too good quality of these Hooker exhaust plates, nor the match of exhaust
port. First red markings
are after the exhaust gaskets. A lot of grinding awaits. To the right one
port is done. Until I'll see the
headers side plate anyway. Maybe I'll grind ports even larger towards the
inside diameter of the 2"
header primaries? However, these two bolts are making the most narrow places
of the area, even
if the area is expanding. Note the need of clearance grinding around the head
studs.
June 18
2" headers on their way!

Janne
Norberg of Norberg Race Cars - Umeå's brightest shining star
in my eyes (without even having met him in person yet), is coming
along just fine with our unique headers with 2" primaries for Kent's
and my SS! There are no 2" headers to buy for the SS, you need
to fabricate them. These will help both Kent and me to take our
induction performance to the next level. (That's why I could invest in
the new race intake manifold). And since that smart guy is welding
them in an evolving jig, you too can order a pair which will fit any
B-body! Make Sweden green - send dollars! My guess is also that
Mr Karl Ellwein of Ellwein Engines
will order a couple of pairs for
you Americanos who are interested in boosting performance?
More at >Gentle Giant
June
23
Looks perfect Janne!

Look at this header! An absolute minimum of pieces and welds!
Really good work there Janne! Now the world has great expectations
on what you can do on the tricky driver's side...? The cylinder 7 pipe
will be very interesting! Good luck!

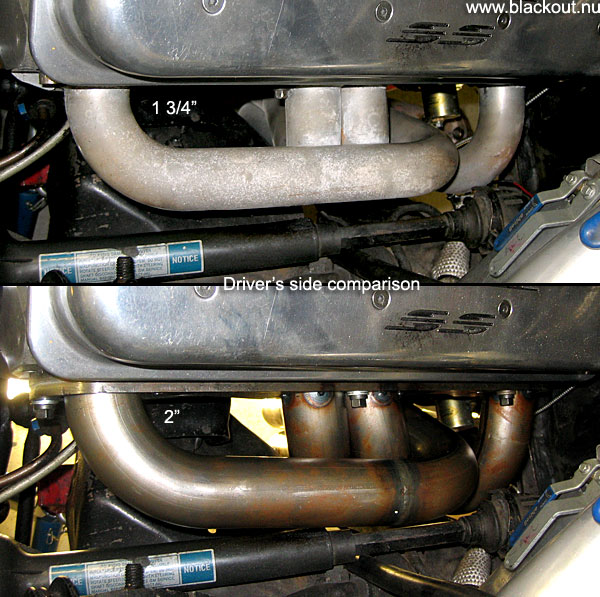
And they fit! Remember these are of 2" pipe diameter and are coming
out a bit from the heads because of the needed exhaust plates.
The normal aftermarket 1 3/4" headers you buy can be an issue in
this tight B-body engine compartment. Kent says: "They actually
fit a little better than the headers that Karl lent to us"

3.5" collector looks good in its place! Minus flanges and bung for the
lambda sond. And evacuation pipe/valve - which will be used on the
collector on the opposite side of the lambda sond, of course. We
don't want to drag oil fumes into the lambda sensor.
Bigger pictures and more on Kent's own page:
>GENTLE_GIANT
June 30
The Saint from Umeå!

Janne Norberg did it again! He didn't even think that the driver's side
header was trickier than the passenger side. Well, what can you
say? Congratulations to us all! Janne has already impressed the big
shots that daily visit our TBDGIT and I'm sure many others. For an
example: "...that guy with those Umeå-headers..." Lars-Inge
Johansson said today and nodded his head, and he ought to know
with + 25 years of welding headers and cars and what have you!

That # 7 pipe that I thought would be the trickiest to make because
it points straight into the steering, wasn't any problem for Janne.
Kent adds that these headers are possible to mount with the spark
plugs already in the heads. Another trick is that the # 1 and 2 pipes
(furthest to the front on both sides) are possible to loosen separately
from heads and the collectors and that makes it easy to access
all the spark plugs. "Much easier and quicker than with bought
headers" says Kent. This is getting better and better!
Meanwhile in TBDGIT Gothenburg...
...our headers problems!

The Impala King Jonas Mr Alholt Skruv and Lars-Inge Johansson
helped out tonight with the stressy mounting of headers with hardening
black silicone instead of gaskets. (At least two persons needed).
Of course everything happened that never happened before! For the
very first time some bolts were not going straight into the head or
they were too long (gasket is thicker than silicone). We began
very professional and ended up sweaty and had black silicone and
copper paste all over us and the place. We just laughed and
backed off and did it again. I mean, these guys never go for
something that "might be good" - they rather do things over and
over
again until they know it's perfect. So it was off with pipes and using
a 3/8" threader and this and that! So we actually ended even more
professional than we began.
I'm not a complete idiot but it's certainly a good school to just have
them around I can tell you! So many years of Hot Rodding they have
combined! Think of the situation for a while - these heavyweighters
Jonas and Lars-Inge suddenly just show up and start helping me
with whatever I'm doing with the car! I'm lucky! Thanks Idols!
Let's marry!?

Real racers knew all the time. And I knew it already from Birgitta at
Autoshop years ago when she said they only used black silicone
instead of header gaskets. When I this time forgot to order header
gaskets it was time to do the sticky business myself. If just letting
the silicone to harden for 15-20 minutes (not too sticky and not too
hard) it was no problem. Not with the silicone itself anyway...
But I'd rather go with gaskets. That's me. Less sweat.
December 27
I'm reborn again!

Oh what a good feeling to be back and work on the SS again! It felt
like a forgotten door in my heart that opened again. I haven't been
working in TBDGIT since...October. I have had much more
important issues to address.
But now, I felt more and more happy by the hour. And inside here
all the outside problems seem to be much smaller.
I jacked up the Blackout and thought it was a good idea to start with
removing my old headers and try on the new ones.

The real Tomten wears all black! Jonas Mr Al Holt Skruv came by
TBDGIT and dug in immediately...well, he actually took over, cleaned
up my space, had coffee, kicked my ass and speeded up the process!
- Jonas, were you also in need of something else than Christmas?
- Bah! I hate Christmas!

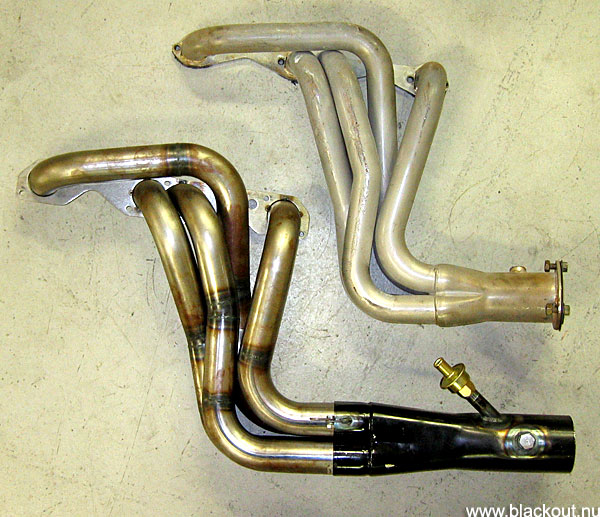
First visual comparison between my old Quad-1 headers (top) with
1 3/4" primaries tubes and 3" collector, and the newly custom made
headers with 2" primaries and 3,5" collector.

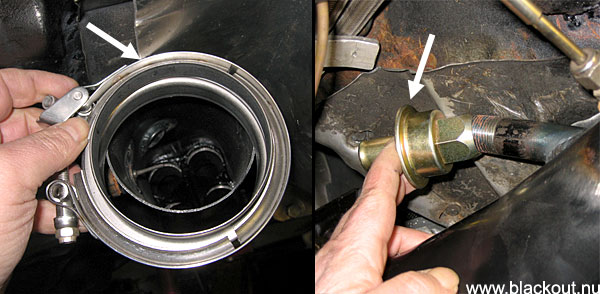
The collectors will have Burns stainless V-clamps welded on. That
for making disconnecting and connecting of the exhaust system
much easier. No more nuts'n'bolts, 3-hole flanges, leaking 3-hole
copper gaskets and cursing under the car!
Note: that collector with the vac-u-pan valve will be on the driver's
side collector, while the O2-sensor will be on the passenger side.
I ordered bungs enough so I can switch them in between.

It was exciting minutes when trying the new header on the passenger
side. Will they fit right in? Well, they didn't. Janne Norberg made
them exactly like the first pair for Kent's
SS and he has the much
smaller Tilton mini starter which you can see on this page at Ellwein
Engines. I also have a very small starter, a Powermaster, but its
solenoid still sticks out making the difference. I'm glad I asked Janne
to only tack-weld the tubes to the flange, because it looks like we
have to cut at least two tubes on the passenger side and have them
re-welded. So I'm also glad that I know a black-dressed Tomte
who hates Christmas...
December 28
Bah! Damned tubes!
Get me that calm Christmas again!
Today it began so good. Like when getting this comparising picture on the
old (top) and new headers.
No problems so far...
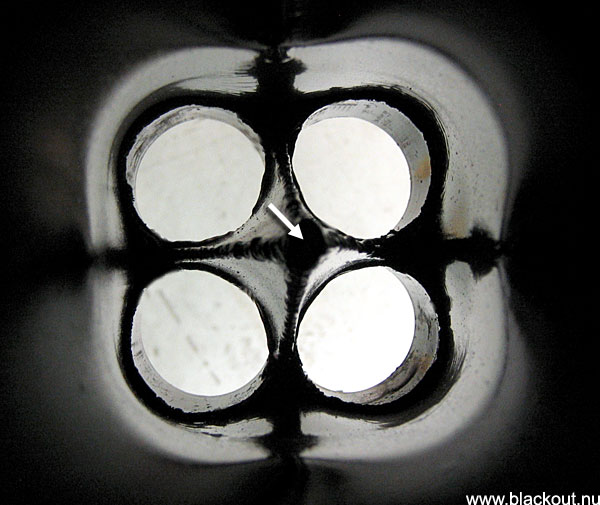
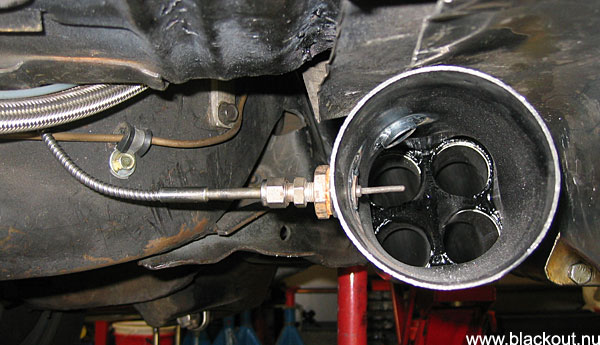
These merge collectors have a long transition to provide better flow. It is
like a welded "tower" in
the middle of the outlets from the primaries.
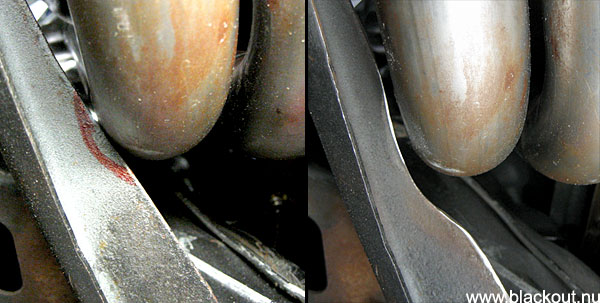
Never touched by human hand... When mounting the driver's side header it began
with a minor clearance
problem. One of the tubes touched the frame so it was quickly fixed with a
grinding machine.
So far so good...but underneath now showed me more problems...
This car and Kent's car are not identical at all.
The collector had clearance issues everywhere, like the bung for the EGT sensor
which stuck the
collector to the floor heat shield before getting itself fully pushed onto
the primaries.
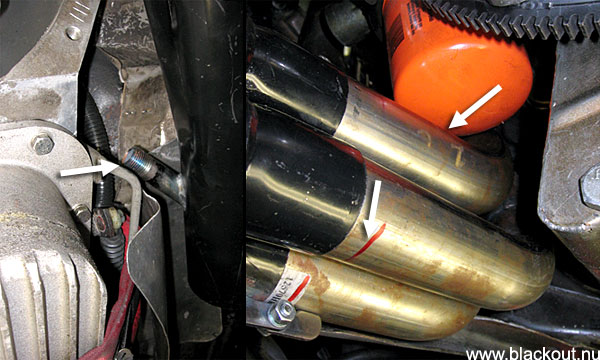
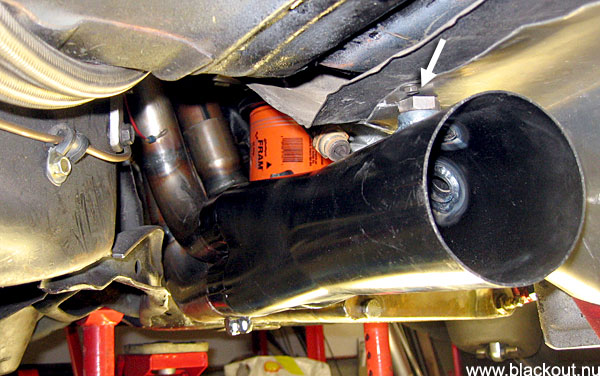
The outlet for the vac-u-pan valve just stopped on the transmission. Cylinder
1 tube touches the (short)
oil filter. The collector couldn't be pushed all the way on the primaries...
Now I can see myself at the Christmas table again, eating herring, meatballs
and having a snaps or two.
And a beer. And forget about problems...
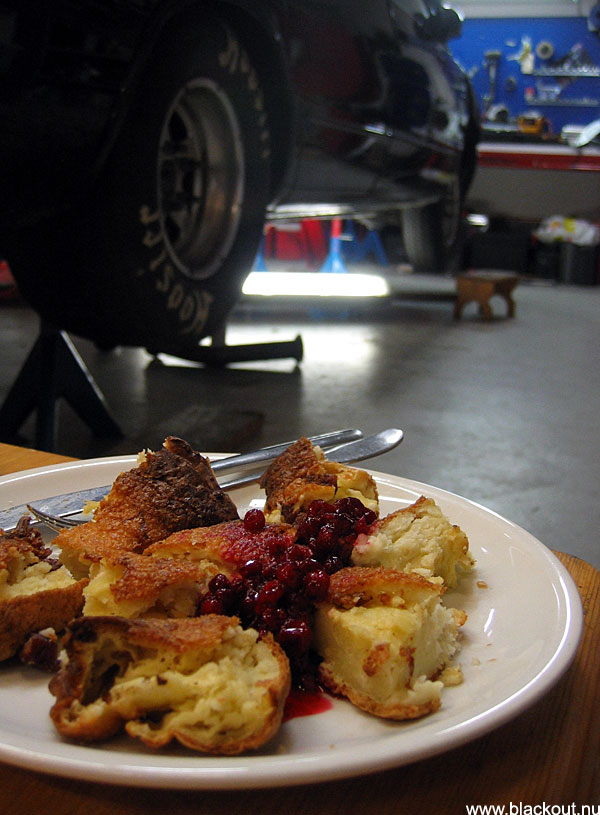
But Fläskpannkaka
with Lingonberry jam is just as good. Mmhh! Perfect
to bring to the garage
and just microwave. Thank you Dear Agneta!
January 2
The solutions of the New Year

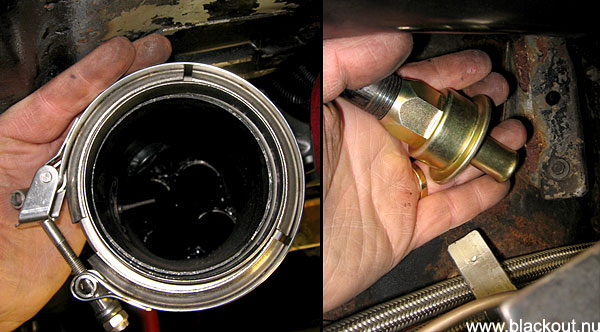
I had to unwrap all firewall wiring to get the EGT-cable free so I could relocate
it and win some inches.
Lucky me. It was possible to win enough inches so I could enter the EGT sensor
from the side (left)
instead of from above. This is also the way the originator Janne Norberg of
Norberg Race Cars in Umeå
designed these headers in the first place, to have this extra bung on the
left side of the left collector.
One of the problems solved.
Next. Minus space for V-clamp and the vac-u-pan valve. OK, get rid of the
heat shield(s) bolted to the
floor to begin with. I'll make some new ones sometime in the future.
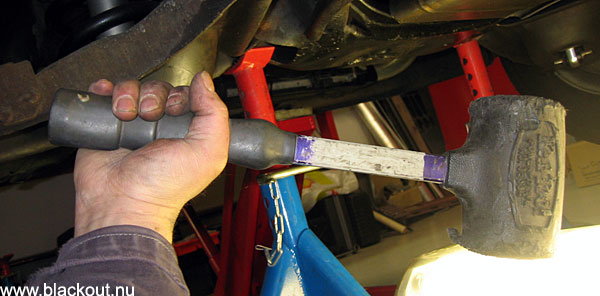
A good heavy instrument was used on the Impala SS floor. Collector's car or
not. After a fine adjustment
like this, please make sure that "full throttle" on your accelerator
still is full throttle also at the throttle
body since the brutally raised floor may affect accelerator's ratio... (I
check this every spring anyway)
Ahh! See! I like when you get fingers in between as a clearence measure on
things underneath the car.
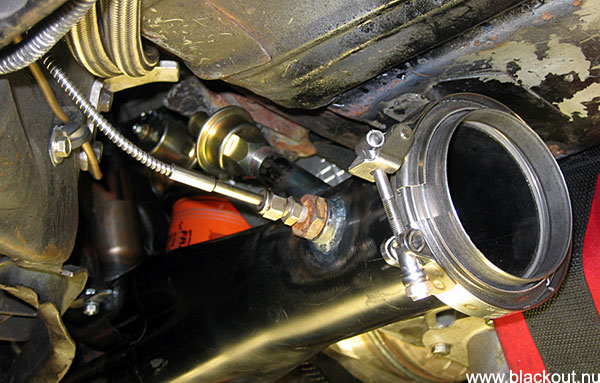
All issues solved! Good hours in TBDGIT. Next step is actually to loosen the
tack welds of the primaries
tubes on the flange at the head, just to angle all of it a bit from the engine
to win a few millimeters in
height clearence down here. So now let's find that Black Tomten with his TIG-machine
who seems to
have disappeared since last time. He doesn't even answer his phone. That's
just him.
Maybe he's deeply in love and doesn't want to talk about it??
I'll be back soon, you will all know if he's in love.
May 21 - 2009
Mounting begins
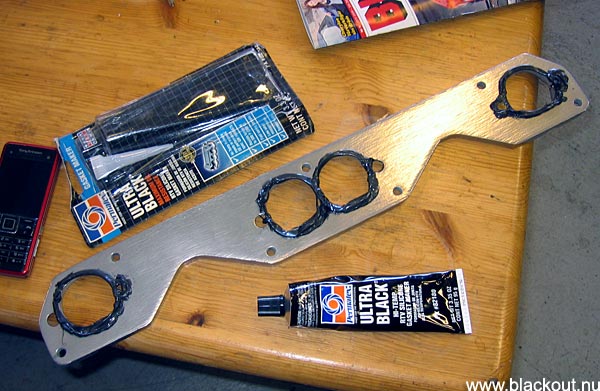
The flanges are going onto the heads with Ultra Black Hi-temp silicone as
gasket. I let the silicone
dry some before mounting to let it harden a bit to get just a little thicker
gasket. I dream up that this
a good way to do it. After a cup of coffee it's time to mount.
It's a balance act to get it on without spreading the silicone all over the
place and yourself. =)
The excess silicone will burn away. I wiped it anyway.


