
BUILDING AN 8-POINT ROLL CAGE

My chromed
roll bar is sold to Doug Youth in Hawaii, so the roll cage will not be an addition
to the roll bar.
It will be entirely built from scratch, pretty much like this sketch.

When we were in Atlanta for the SSHS-5 race in 2005 I looked around for B-bodies
with roll cages to see
how they had solved it. There were only a handful of cages to see. Here's the
solution in all-out racer
"Black Wolf" of Karl Ellwein where they just put the bought cage kit
further back inside car to avoid
the hassle of going through the instrument panel which would be a nightmare.
Just like my sketch,
and this is the way I'm going as well.

The main
loop dummy in progress. The design will differ a little from the roll bar loop
because
of the forward going bars. The cage will be made in chrome moly and the main
loop here will be
in 1 3/4" - rule book says 1 5/8" but as the SS is much heavier than
the normal race cars I
thought a little stronger would be a little better. The rest of the bars in
this cage will be
according to the rule book 1 5/8" - 1 3/8" and 1 1/4"

It will be
very tight for the head loop, especially since I want to keep the sun visors.

I finally thought that the head loop was too difficult to make, and it would
not look good, so I went on
to make longer front bars instead. It's fun to make dummies.

You can only come so far with cardboard. When bars need an angle you need something
else
to work with.

I called an electrician I know. Classic VP pipes in PVC is perfect. 40 mm is
a standard in Sweden.
Heated up quickly with propane and cools off slowly so that you have time to
hold it in the angle you want.

It ain't pretty but it works. The straight parts and the outer radius is the
important information for
the professional chassie builder who is going to do the bending of the chrome
moly tubes.
Once again Bengt Wittander of Competition Cars in Lund will do this for me.

The pipes give you a lot better visualization of looks and clearance. Parking
brake pedal, brake release,
hood opener, light controls etc. need to work as normal.

There will be two cross bars as well, under the panel in 1 3/8" and at
the top of window in 1 5/8".

Rear bars were easiest to make. Absolutely straight backwards and only two bends.

As in the case when I built the roll cage a couple of years ago, I managed to
save the speakers also
this time. Here the speakers are replaced with blocking lids, done by the drag
racing rules if you
have a fuel cell in the trunk.

Actually there was only one place, one way, to put this bar through the hat
rack if avoiding speakers,
and trunk lid hinges and stuff. I chose the point in the frame a little bit
rearwards so the bar won't
interfere with eventual bigger wheel tubs, if in a future I want to build that.

This is the way they did it in Snowflake with an Alston Chassieworks 6-point
cage. Not a streetcar as
you can see. All function, no glamour. Snowflake has gone 10.60 by builder Bernie
Steinke, an IHRA
Pro Stock mechanic. However, in Atlanta it was owned by Brian Herter but borrowed
and raced by
Glen "Stumpy" Koenig - and me! And it was very close I got to test
this cage...read about it.

A couple of days in The Best Damn Garage In Town and the work is done! Now Bengt
Wittander of
Competition Cars in Lund will take it from here and make reality of it. I really
look forward to seeing
it translated to chrome moly!!

Hm?

Wittander will also update
2005 Bilsport Pro Mod European Champion Patrick Wikström's
Tim McAmis 2000 Camaro. No cardboards, no plastic pipes...how can they communicate?

Stock SS carpet is much thicker and made of more plastic (back side) than the
one I bought from Street
Trends in Calsbad, California. New carpet is only 1/3rd the weight! And this
weight reduction means that
the Blackout SS will be lighter with new roll cage! Excuse me, but isn't that
called...luck?

Floor has never been in the open before. Rusty surfaces but not too bad. Needs
a little brushing
and paint to make me feel good.

Some violence and cursing was needed to cut off the main loop bolt plates. They
were welded good to
the thick floor! Now they're soon off to the new roll bar owner in Hawaii, Doug
Youth!
Looking good!

When waiting for the bent bars from Wittander, I had time to fit the new carpet
to the car.

It's just wonderful to get the roll cage kit like this from Wittander! Every
end is a little extended so I'll
need to put these chrome moly pipes onto the dummies to begin cutting, a little
at the time.

So far - so damn good! First evening I managed to fit the main loop! It takes
time since you want a
perfect fit at the welding points (and the frame isn't that flat everywhere!)
But here it stands...

Looks like it's tailormade for the SS. =)

Just like the bent plastic dummy. I'm so happy!

This is just what I have been longing for to see.

Backseat passenger side. Must give enough clearance between bar and roof for
padding.

Looking good.

It's really tight clearance to get the rear bars straight in the car. I even
had to cut off the levers for the
trunk lid torsional bars to be able to lower and raise the frame when it's time
for welding.

Apparatus Roll Barus And Cagus Extremus Smartus - borrowed it from Jonas Alholt
who just has
released his new company: Weld Done. Or was it Very Weld?

What can I say 1?

What can I say 2?

The final dummy could be made now when the frontbars are in their positions.
This bar will also be
made out of 1 5/8" chrome moly.

Bengt, this will be toughest one of them all. Three bends, three different angles.
That's because the
front bars are different.

What can I say 3? That jig I borrowed from Jonas Alholt must have saved me a
week!?

So, the final bar bent by Wittander - the window cross bar - is fitted to the
rest of the cage and now
all bars are ready to be TIG-welded together, first tack-points then we lower
the chassie for full
access to weld full 360 degrees on all joints.

Missing here would be the crossbar in the main loop (safety belt rear anchor)
and the lower crossbar
just above the legs. The latter one will come on last of all. Here I've taped
up the passenger side
side bar in its position to see how it's going to be.

The (absolutely too heavy) Alston Chassis Works' swing outs will be placed so
when sprint is removed
the side bar will drop to the floor (on a rubber stop something) giving space
for in and out movement.
Same design on driver's side.

The rear swing out placing.

Nice to get going again! First a round of Scotch-Brite to get a better contact
for the weld. Then Jonas
Alholt tack-welded it with the TIG.

Everything is important to a perfectionist. Jonas didn't allow me to tack-weld
with the MIG.
"I'll do it with the TIG instead, it will be better!" Next: drop the
frame...next week.

Well, after having been convinced by Mr Alholt I've decided to skip the elephant-weight-swing-outs
and
am now building permanent side bars like this. Yes, I know and I'm sorry to
all you SS-fans but I then
have to cut some material out off the door side as you know! But it's "only
an inch or so". I promise
you to do it carefully and as nice as possible so you all get to know what can
be done! Forgive!

This is the big advantage in doing it permanent. You'll get an 8-point cage
instead of a 6-point.
Let's see some wonder TIG over this now! Jonas where are you?

I'm glad I'm so athletic...he hm. And I really wonder what will happen at the
yearly inspection for the
Swedish Traffic street legal certificate...? I hope it will be a young inspector
taking on the SS...an
athletic girl or so? And sorry for the mess! But everything's under control!

If Kajsa can - I can...

Sorry for the mess 2. How about that cross bar? I know Mr Alholt will love it...he's
over me big time!

Safety belt retaining loops on the inside (aiming towards back of the seats)
of the cross bar. Jonas is
using the welding helmet and gloves he gave me on my recent birthday. Bit by
bit we're creating an
Impala SS roll cage Extra Ordinary. Bragging? Absolutely!

Tacked in place, the long diagonal bar and the rear cross bar. Missing here
is the diagonal cross bar
from the main loop (behind driver's head) over to the rear bar to the left in
picture, which we will place
there when the cage is lowered.

It goes to this lower point. Two cuts in the floor will make it possible to
lower the frame from the body so
we get better clearance for the full TIG weld. Next step is actually to lower
the frame! Yahoo!

Many many hours in these 11 small 3/4" chrome moly tubes. Many.

Frame on its way down and the cut channels work just fine.

Meanwhile some action from my wife Agneta, who brushed the rust surface out
of the car.

And painted it with zink ground afterwards. Dear Agneta - kiss hugs kiss!

It will be lowered even more before welding. The rubber body bushings will be
changed to
polyrethane ones when frame is going up again.

I just love to see these TIG-welds!

And I thought that I was athletic...Jonas is ready for the Olympics...

All eighteen 1 5/8" joints are done! Next time we'll take the eleven small
3/4" ones.

Meanwhile I'm preparing the boxing of the factory weak u-frame on both sides,
at the main loop points
at least. I wonder how many SS-owners in the world who have done this? Driver's
side boxing.

Passenger's side.

To find the right grey color for the roll cage was interesting, since Chevrolet
didn't bother to have
the same tone of grey all over the interior. I guess there are 3 or 4 different
tones of grey in there!?
Not even the seats are complete, can you see that the head restraint is more
blueish!?

In choosing I did go for the "most represented" Chevrolet grey in
the interior. That is a warmer
more yellow (not so blue) tone. I've also noted that a perfect match like above
looks
a little bit off on a flash picture like this. Hm?

You see, different greys all over. Front panel, front panel top, Inner roof,
B-pillar plastic, door padding,
door handles....I guess I have chosen something in the middle?

Frame down to a maximum with engine, trans and rear end still there. It's lowered
a little more
than 30 cm/1 foot. Brake lines'n'stuff are kind of straightened out =)

All to get Jonas happy with the clearance. Here he's working on the driver's
front point. But he still is
grumpy because he likes RACE CARS which have total access and hates STREET CARS
because
of the lack of access. I have heard that before, from "Baker" Bergqvist
among others...
But HEY guys, it's fun when it's done!

Darth Vader working on the small ones. Just love welding pictures without flash.

Darth Vader again. Click picture to see a full size version...

The rear point on passenger side.

Suddenly all was welded!

And even Jonas was satisfied (kind of) after an inspection. Thank you for a
Weld Done job!

So a couple of hours later I could put on the primary ground paint. Not too
easy I might add.

Happy afterwards!

The paint job has to be done in at least two stages, when the frame goes back
up again.

FAMILY CAGED IN THEIR CAR!
Grinding, spraying, grinding, spraying... Hot! No air! Chemicals! Nowhere to
escape!

Ahhh!!! How wonderful it is to have had come this far! The paint is on! Cheers!


Rear points painted black, as the rest of the trunk.

"Boxy but good"
It feels very good to have this U-frame boxed with some 3 mm steel plate.

The padding went on. Next the frame will go up into the SS again. The project
has come to its turning
point. Cheers!

The frame went back up again and Jonas could reach to do the last TIG-weld of
the front cross bar.
This is down at the driver's side.

The Acrobat Welder! Thank you Jonas!

There it is!

The work to cover the holes in the body started directly. This is driver's side.
There is some
remaining paint job since some parts of the tubing were of course hidden in
the body before.

Passenger side. All welding now done, thanks to a very speedy professional.
Now some body filler to this and finalizing with zink primer by the brush.

Agneta working hard to freshen up everything in the interior. The car has never
been so fresh before!

Now when relying more on the strength of the frame and roll cage, the body sills
holes are just covered
with aluminium and silicone. Next: the interior back in! This is the driver's
side Main loop.

This is the Driver's side front. This also shows that I have some painting to
do.

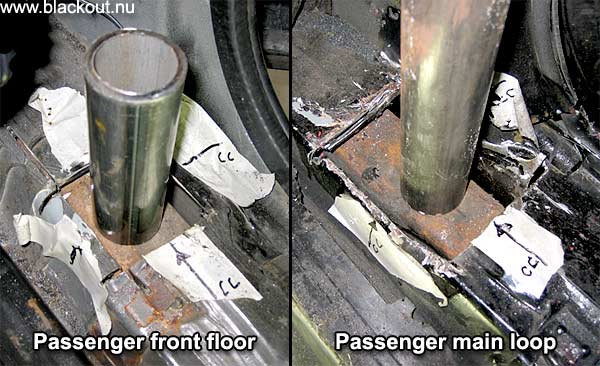
This is the passenger side Main loop.

This is passenger side front.

Wonderful!

Wonderful!

Terrible action with a lot of measuring before cutting in to the underneath
of the textile cover of the
hat rack. You just do this once! But it turned out to be just wonderful!

Wonderful!

Wonderful! But hey Doug, I need those speaker covers real soon now! Don't send
to Autoshop,
send to me directly!

Wonderful!

Terrific! I will modify the soft armrest padding later.

Amazing!

Terrific!

Consol going back in. I modified it to hide a lot of cables that irritated me
before. I also made a small
hole to be able to have the EGT cable (exhaust gas temperature) coming straight
up to the EGT-
instrument. This cable was just on the passenger side floor before.

At last I could bring back driver's front seat and mount the safety belts in
the cross bar.

Good side clearance! Mmm, it feels so new and fresh!

Who do you think was the first to sit again in the car?? "Move away"
Jonas told me and entered in a
rarely seen jump. He liked it. And I think part of it is because he just came
from a completely different
world in drag racing - lightweight and as lightweight as possible! That was
the story with his Melmac
Mustang with twin turbo 289 which he just sold! Now he deals with this 2 ton
- 4444 lb HEAVYWEIGHT!
I think he likes the contrast! But I've seen him begin to throw away washers
from my Blackout SS!!

The big Sit-In has begun! Melle and Mona wanted to test out the new roll cage
interior.

As did Mr Top Fuel Thore. Everybody likes the caged interior and was also surrpised
by the SS comfort.

And at last the glove compartment lid is back in place after a couple of years
on the shelf. All the
electrical wiring will disappear when FAST-boxes are connected.

It's very tight between lid and roll cage, 1,5 mm, as expected. I was holding
the tube right there when
Jonas welded it to the frame.

Some sharkbites to begin with! I'm working on the tube clearance in the door
side pads.
The Big Sit-In continues every day...

A friend from our childhood in Umeå - Nisse Malmhäll visited relatives
in Gothenburg and wanted to
visit me and our SS in
my garage as well. Nisse works at the "scary" Svensk Bilprovning (second
picture
on this page) as a technical expert. I had him to pass my Impala SS on the
spot. Then he got coffee.

Agneta cleaned the last areas of the interior. What a difference it has made!
Thanks Agneta!

"Dad?" Yes what is it? "Can I start?" No you can't just
yet... "Uhh, it's so unfair!"

Nice with the new mats with deer logo.

You can clearly see the difference in the grey tones in the interior in a flash
picture like this.
I'm glad it's much better in real life.

The back seat, where you can sit and drink beer and shout...

The dome light cover had to be cut even more this time to make it fit together
with the main loop. Yep.

Rolf "Loffy" Lundberg, Linköping, Technical Grand Master of Swedish
Drag Racing - a chapter within the
Swedish Automobile Sport Federation (FIA-sanctioned) - visited TBDGIT on his
"spring tour" of 2007
going through several racing garages in south of Sweden and Denmark. He came
by to inspect Patrick's
updated Pro Mod Camaro and my roll cage and eventually pass them? Gulp...

"Loffy" checks all dimensions and thicknesses of the cage.

"Loffy" finally sticks the "award" to the cage. Good to
go 7.50 with the Blackout SS!

Final picture.

